Import from Word into Plottr
Learn what import from Word into Plottr is, plus how to use it (and why you should try it). This article explains how to use the Import from Word into Plottr feature.
What this Article Covers
3 Ways Word into Plottr Import Streamlines Workflow
What is Word into Plottr Import?
You are now able to import .docx Microsoft Word files into Plottr, creating plotlines, scene cards, summaries and headings straight from your Word document.
Before we Import a project into Plottr you need to make sure you format your Word document correctly.
Download the templates below that have been formatted to help you do just that. Then keep reading for a deep dive into Word to Plottr import.
- Download the Word to Plottr formatting template (no act structure)
- Download the Word to Plottr formatting template (with act structure)
3 Different Workflows
We have a blog post created going through different options on how to set up your Workflows using both Plottr and Word. You can view it here:
https://plottr.com/import-from-word-into-plottr/
How to Import from Word to Plottr
Note that you can only import the latest Word document format: files must have the .docx extension.
To import from Word to Plottr:
- Open the Plottr Dashboard and click Import File
- From the options that appear, click Word (docx)
- Select your pre-formatted Word file and open it from the dialogue
- Your file should appear in the timeline view with headings, scene cards, and other elements, provided that you formatted your file right
How to Format Word Documents for Plottr Import
One key thing to understand about Word to Plottr import: Word heading styles.
Styles are a set of formatting rules you can apply with one click to ordinary text in Word. For example, H1 styles (an abbreviation for Heading 1).
Using different levels of headings in your Word document is what tells Plottr where to put what text when you import your Plottr file. Here are the basics, first for importing files without adding act structure in Plottr, then for importing files when you want to add act structure.
How to Format Word Files to Import to Plottr (Without Act Structure)
In Word, here is how to format each element you want to import:
- Use H2 heading styles for each chapter/scene/beat title: For example, writing “Chapter 1” in an H2-level heading will add a column heading in the Plottr timeline titled “Chapter 1”
- Use H3 heading styles to title scene cards: You can also add parentheses after the name (still in H3 heading style) to specify the name of the plotline your scene card will appear on in Plottr
If you don’t add parentheses after any of your scene card titles styled as H3 headings, then all your scene cards will appear on a single plotline.
Let’s explore an example.
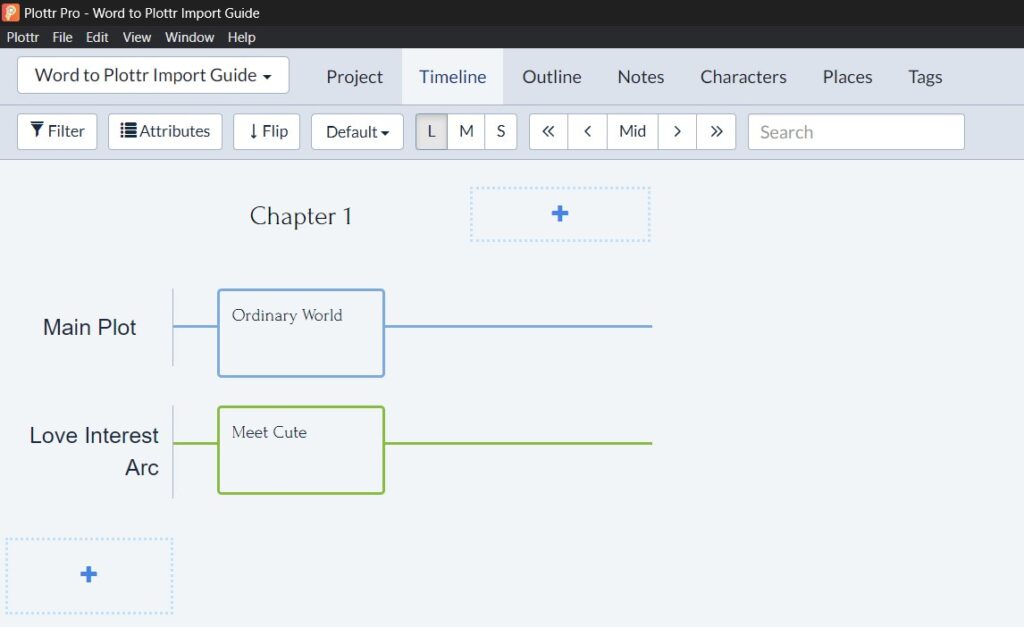
Say you want two scene cards in Chapter 1, the first titled ‘Ordinary World’ on a plotline called ‘Main Plot’ and the second titled ‘Meet Cute’ on a plotline called ‘Love Interest Arc’, you would format this:
[H2 heading] Chapter 1 [End H2]
[H3 heading] Ordinary World (Main Plot) [End H3]
[H3 heading] Meet Cute (Love Interest Arc) [End H3]
After creating a simple Word document with just three lines formatted as above, this is the Word import result:
How to Import Scene Card Summary Text from Word to Plottr
It’s easy to import scene card summaries from Word:
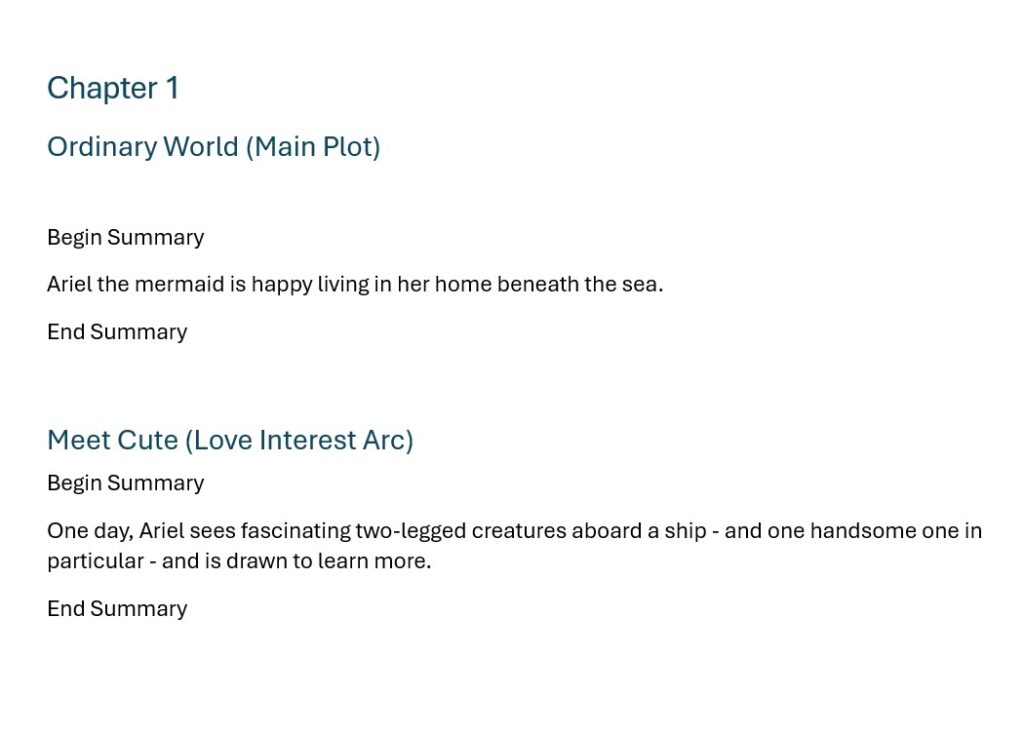
- Begin Summary: Beneath the H3-level chapter/scene/beat name, add the capitalized words ‘Begin Summary’ on their own line in normal paragraph text, before the text you want added to the scene card
- End Summary: At the end of the section you want to import as scene card summary text, write ‘End Summary’ on a new line
Example:
Here is the formatted Word document:
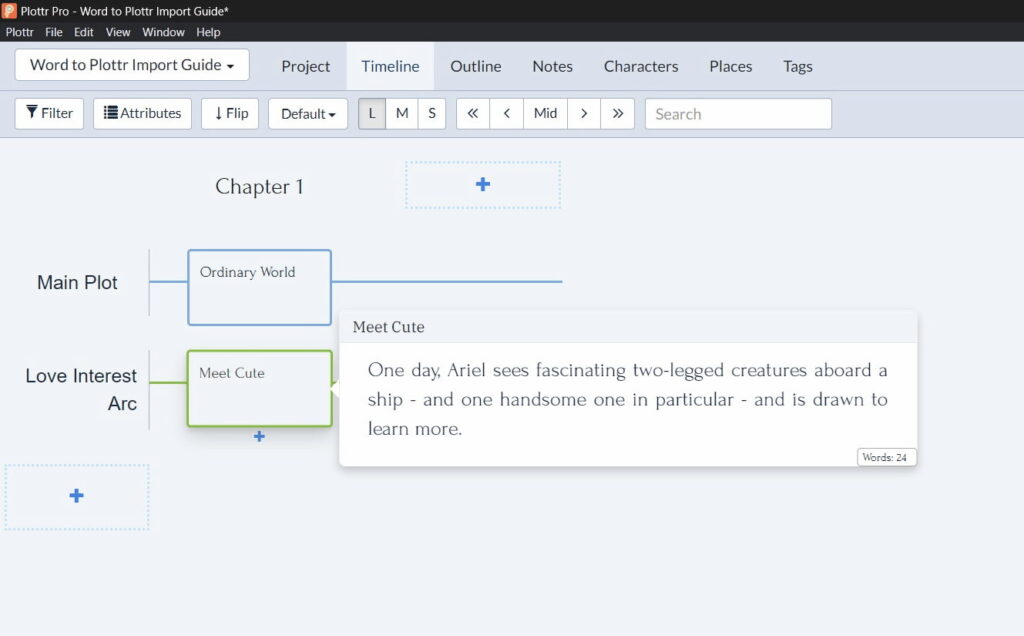
And here is the result when imported to Plottr — now there is scene card summary text:
How to Start a New Chapter/Scene/Beat in Word to Import into Plottr
What if you want to start a new story unit (and not to keep adding scenes vertically in a column on new plotlines)?
Easy: Add the next story unit’s name (such as “Chapter 2”) in a new H2-level header.
How to Format Word Files to Import to Plottr (With Act Structure)
What if you want to add act structure to your Plottr file via Word import?
The principles are exactly the same.
Now, though, different styles correspond to different parts of your Plottr file:
- Use H2 heading styles for act structure: For example, writing “Act 1” in an H2-level heading will add an act called “Act 1”
- Use H3 heading styles for scene/beat/chapter titles: Remember, without act structure you would use H2 for these. Basically, each story structure level now moves one number down
- Use H4 heading styles for scene card titles: These would usually be formatted in H3 without act structure
The easy part? You’ll still use Begin Summary and End Summary to specify where to begin and end the text you’ll import to your scene cards (only now, this will appear between scene card titles styled using H4 headers and not H3 headers).
To start a new scene/chapter/beat story unit with act structure, just format its title using an H3-level header.
What if You Don’t Want to Import Parts of Your Document to Plottr?
Any normal paragraph text that you do not format as a heading using H styles, or do not add between the words “Begin Summary” and “End Summary”, will not be imported.
This means that you can start each chapter in your manuscript with the summary text to import to your outline, then draft the entire chapter, and just import the overview information you want to track.
Want a little more help with Word to Plottr import? Watch this brief explainer video: